Social Link Implementation \ Profile page
In this part we will explain you how to add Social Link to the profile page of your users, so that your users can link one or more social network accounts to their existing account.
- Accomplished the Social Link Setup
- You have added a table to your database in order to store the
user_token. - You have added a simple callback script to your system.
- You have added a table to your database in order to store the
4. Include our JavaScript library.
The library must be present only once on each page. If you have already implemented another of our services, then you might already have added the corresponding code. In this case you can skip this point.
Our JavaScript library contains the functions required by our services. The library is loaded asynchronously (in the background) and does not increase the loading time of your website.
It is compatible with pages served using both HTTP or HTTPS.
The // before the path to the library is a protocol-independent absolute path, which detects whether your site uses HTTP or HTTPS.
No modification of the code on secure pages is required.
Our recommendation is to add this code snippet to your website template so that it appears before the closing
</head> tag. As it is loaded asynchronously, you can however add it basically anywhere in your template.
<script type="text/javascript">

        /* Replace #your_subdomain# by the subdomain of a Site in your OneAll account */
        var oneall_subdomain = '#your_subdomain#';

        /* The library is loaded asynchronously */
        var oa = document.createElement('script');
        oa.type = 'text/javascript'; oa.async = true;
        oa.src = '//' + oneall_subdomain + '.api.oneall.com/socialize/library.js';
        var s = document.getElementsByTagName('script')[0];
        s.parentNode.insertBefore(oa, s);

    </script>
5. Add Social Link to the profile page of your users.
The profile page is a page that is only available after having logged in on your website and can be used by your users in order to update their account settings.
Update the template of the profile page and insert the following code at the place where you would like the social networks to be displayed.
Make sure to replace #callback_uri# by the full url to the callback script created during the setup.
The UI goal should be that users can easily identify that they can link their social network accounts to their profile on your website.
<div id="oneall_social_link"></div>

<script type="text/javascript">

    /* Replace #callback_uri# by the URL pointing to your own callback script */
    var callback_uri = '#callback_uri#';

    /* Dynamically add the user_token of the currently logged in user. */
    /* Leave the field blank in case the user has no user_token yet. */
    var user_token = '';

    /* Embeds the buttons into the oa_social_link_container */
    var _oneall = _oneall || [];
    _oneall.push(['social_link', 'set_providers', ['facebook', 'google', 'twitter']]);
    _oneall.push(['social_link', 'set_callback_uri', callback_uri]);
    _oneall.push(['social_link', 'set_user_token', user_token]);
    _oneall.push(['social_link', 'do_render_ui', 'oneall_social_link']);

</script>
The user_token is a unique identifier that you receive from our API whenever a user connects with Social Login
or links an account using Social Link. The user_token uniquely identifies each user.
For users that have never logged in with a social network account you might not have a user_token yet.
In this case just leave the user_token empty to have our API create a new one.
After having received a user_token from our API you have to store it in your oneall_user table
and include it each time that you display Social Link to the same user.
Test your setup
If you have finished setting up your account settings page then do a first test by clicking on one of the social network providers.
You should be prompted to login with your social network account, then be redirected to the callback_uri.
6. Setup the callback script.
After having clicked on a social network icon the user is forwarded to the login page of that social network.
Upon successful authentication the user is redirected back to the callback_uri.
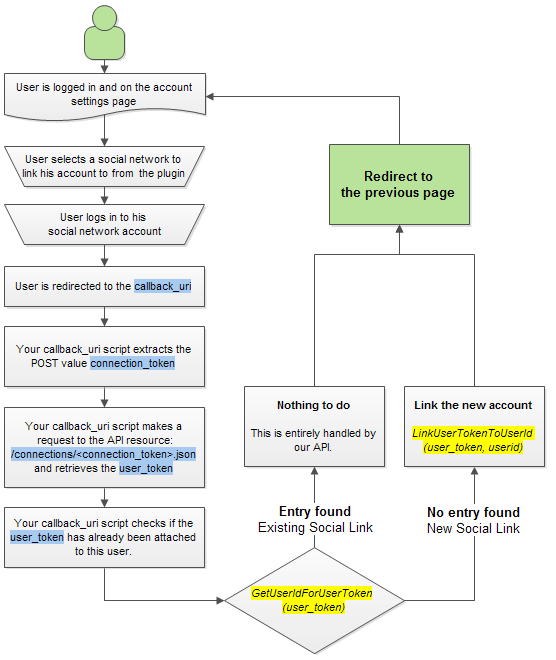
The purpose of the callback script is to read the POST/GET value connection_token and to fetch the user's social network profile data by sending a HTTP request with that token to
the OneAll API.
Social Link Workflow
Basic Callback Script
In the first part of the guide you have added a basic callback script to test the Social Link integration.
    <?php

    // Check if we have received a connection_token
    if ( ! empty ($_POST['connection_token']))
    {
      echo "Connection token received: ".$_POST['connection_token'];
    }
    else
    {
      echo "No connection token received";
    }

    ?>
Functional Callback Script
Now you need to improve and replace that script with a working version. Here an example.
    <?php

    // Make sure we have received a connection_token.
    if ( ! empty ($_POST['connection_token']))
    {
        // Retrieve the connection_token.
        $token = $_POST['connection_token'];

        // Your OneAll Site settings.
        $site_subdomain = 'REPLACE WITH YOUR SITE SUBDMOAIN';
        $site_public_key = 'REPLACE WITH YOUR SITE PUBLIC KEY';
        $site_private_key = 'REPLACE WITH YOUR SITE PRIVATE KEY';

        // API access domain.
        $site_domain = $site_subdomain.'.api.oneall.com';

        // Connection endpoint.
        // http://docs.oneall.com/api/resources/connections/read-connection-details/
        $resource_uri = 'https://'.$site_domain.'/connections/'.$token .'.json';

        // Setup the connection.
        $curl = curl_init();
        curl_setopt($curl, CURLOPT_URL, $resource_uri);
        curl_setopt($curl, CURLOPT_HEADER, 0);
        curl_setopt($curl, CURLOPT_USERPWD, $site_public_key . ":" . $site_private_key);
        curl_setopt($curl, CURLOPT_TIMEOUT, 15);
        curl_setopt($curl, CURLOPT_VERBOSE, 0);
        curl_setopt($curl, CURLOPT_RETURNTRANSFER, 1);
        curl_setopt($curl, CURLOPT_SSL_VERIFYPEER, 1);
        curl_setopt($curl, CURLOPT_FAILONERROR, 0);

        // Send the request.
        $result_json = curl_exec($curl);

        // Error.
        if ($result_json === false)
        {
            //Implement your custom error handling here
            echo 'Curl error: ' . curl_error($curl). '<br />';
            echo 'Curl info: ' . curl_getinfo($curl). '<br />';
            curl_close($curl);
        }
        // Success.
        else
        {
            // Close connection.
            curl_close($curl);

            // The result is received as JSON.
            $json = json_decode ($result_json);

            // Extract the essential data.
            $data = $json->response->result->data;

            // The handling depends upon the service.
            switch ($data->plugin->key)
            {
                // Social Link.
                case 'social_link':

                    // Operation successful.
                    if ($data->plugin->data->status == 'success')
                    {
                        // Identity linked.
                        if ($data->plugin->data->action == 'link_identity')
                        {
                            // The identity <identity_token> has been linked to the user <user_token>
                            $user_token = $data->user->user_token;
                            $identity_token = $data->user->identity->identity_token;

                            //Next Step:
                            // 1] Get _your_ $userid from _your_ SESSION DATA
                            // 2] Check if the $userid is linked to this user_token: get_user_id_for_user_token ($user_token)
                            // 2.1] If not linked, tie the <user_token> to this userid : link_user_token_to_user_id ($user_token, $user_id)
                            // 3] Redirect the user to the account linking page
                        }
                        //Identity Unlinked
                        elseif ($data->plugin->data->action == 'unlink_identity')
                        {
                            //The identity <identity_token> has been unlinked from the user <user_token>
                            $user_token = $data->user->user_token;
                            $identity_token = $data->user->identity->identity_token;

                            //Next Step:
                            // 1] At your convenience
                            // 2] Redirect the user to the account linking page
                        }
                    }
                break;
            }
        }
    }
    ?>
7. Make a final test.
Users should now be able to link and unlink social network accounts to/from their existng account.
For your final tests you should first of all remove all entries from the oneall_user table.
First link a a social network account on your profile page and make sure that your system
populates the oneall_user table. The icon of the linked social network account
should now be displayed with a checkmark on top. Then unlink the same social network account.
The checkmark should no longer appear.